Car organizer cleaning and maintenance
Car organizer cleaning and maintenance depend on the material, residue, moisture, removable parts, and care label limits. Emptying compartments, removing loose debris, drying damp areas, and checking the care label are safe starting points. Deeper washing may depend on fabric, plastic, waterproof coating, liner design, and construction. The main variables are material and residue.
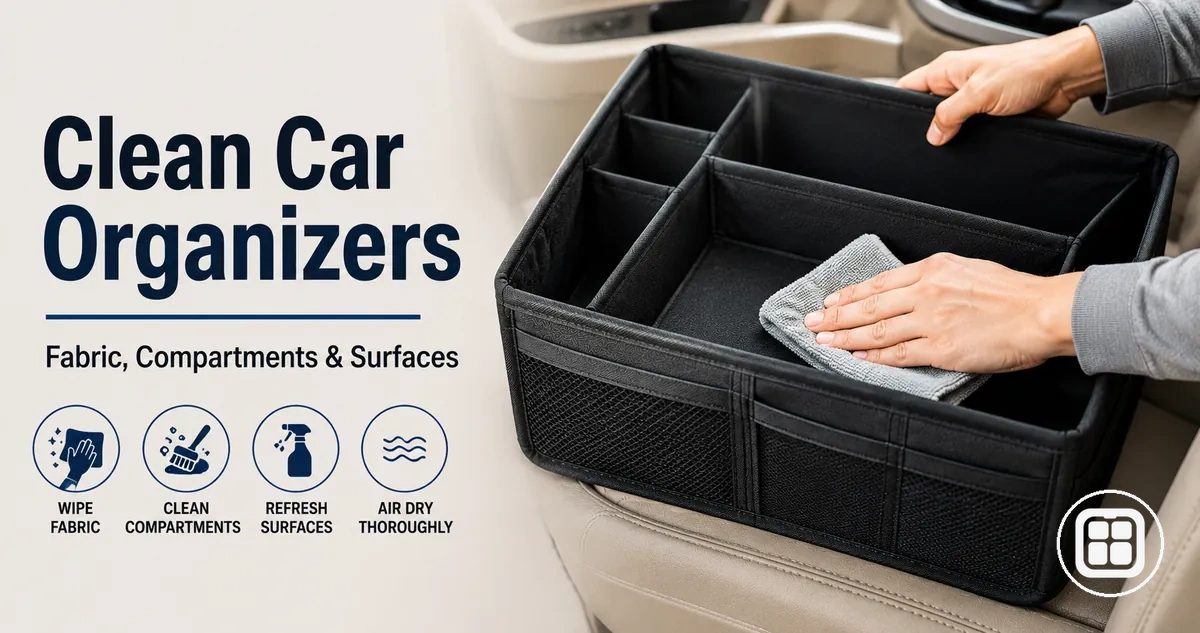
Car organizer maintenance means keeping storage surfaces, compartments, liners, and structural parts usable after regular use. Cleaning handles debris, spills, stains, odor, and sticky residue, while maintenance checks whether the organizer still holds its shape and separates stored items properly. A fabric surface may need more drying attention, while a plastic or coated surface may only need a careful wipe down when the care label allows it. This page stays focused on organizer upkeep, not broader vehicle detailing.
A car organizer can become harder to use when moisture stays in liners, residue collects in corners, or compartments lose their shape after repeated loading. The practical solution is to judge the condition first, then match the cleaning method to the surface and safe care limits. The sections below move from signs that cleaning is needed to material requirements, safe cleaning actions, recurring maintenance habits, common mistakes, and condition-based clean, repair, or replace decisions.
When car organizers need cleaning or maintenance
A car organizer needs cleaning or maintenance when debris, spills, odor, moisture, sticky residue, or shape loss starts to affect normal use. Visible mess inside compartments and liners is often the first sign that attention is needed. The main trigger conditions are buildup, dampness, smell, and structural wear.
Visible debris, residue, moisture, or shape loss can help determine cleaning timing and maintenance needs. The example below highlights common signs that influence when a car organizer may need wiping, drying, washing, or inspection.
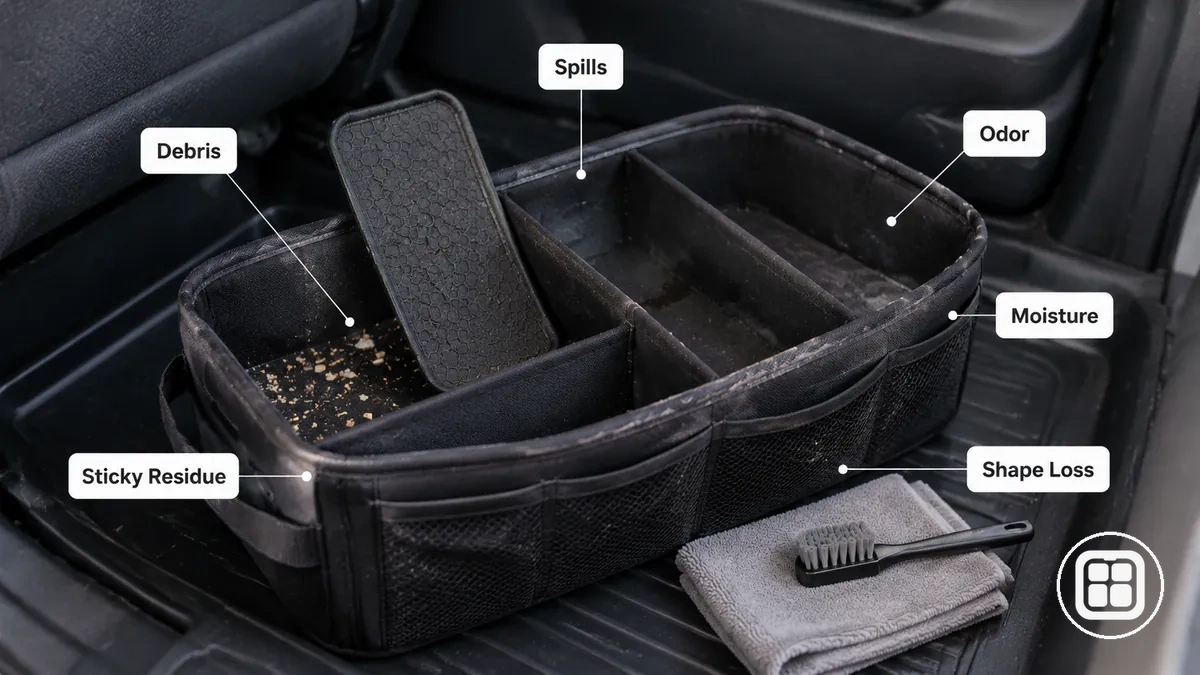
After carrying groceries, kids items, travel gear, or cleaning supplies, a car organizer may collect residue or hold moisture more quickly than during lighter use. Spills can leave sticky residue in compartments, while damp stored items may contribute to odor if drying is delayed. Shape loss can also appear when repeated loads strain seams, dividers, or support panels. Cleaning urgency depends on use conditions and stored items.
The signs of cleaning or maintenance are easier to verify by condition:
- Debris in compartments holding loose items — remove buildup and perform an inspection.
- Spills on a liner or base surface — wipe the affected area before residue becomes harder to remove.
- Sticky residue inside compartments — check the affected section and consider deeper washing if the material allows it.
- Odor from stored items — inspect compartments for trapped residue or moisture and allow proper drying.
- Moisture or dampness in liners — dry the affected area and check nearby compartments for retained moisture.
- Shape loss from repeated load pressure — perform a seam check and inspect structural parts for maintenance needs.
Cleaning requirements by organizer material and surface
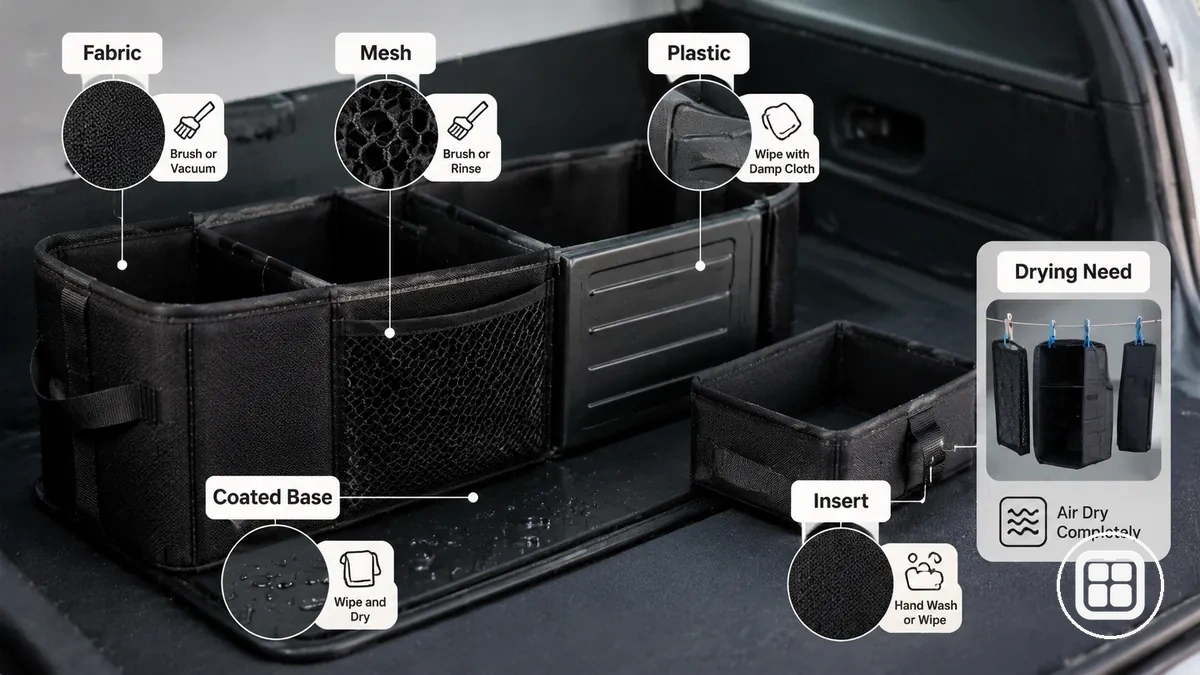
Material and surface type determine how a car organizer should be cleaned, dried, and inspected during maintenance. Fabric, mesh, plastic, waterproof coating, stitching, insert components, and the base structure respond differently to residue, moisture, and cleaning methods. Absorbent surfaces often need more drying attention, while wipeable surfaces are usually easier to clean. Material decides cleaning intensity.
Cleaning requirements by organizer material and surface become easier to assess when visible surfaces and parts are compared side by side. The image below highlights why fabric, mesh, plastic, coated layers, and removable parts may require different cleaning methods, drying need, and maintenance attention. The table organizes these differences into practical cleaning attributes and risks.
| Material or part | Cleaning attribute | Safe condition | Effect or risk |
|---|---|---|---|
| Fabric surface | Can absorb moisture and stains | Allow sufficient drying after cleaning | Retained moisture may contribute to odor or staining |
| Mesh pocket | Collects debris around openings and stitching | Remove loose residue without stressing seams | Buildup may increase wear around stitching areas |
| Plastic panel | Usually easier to wipe clean | Remove residue before it becomes difficult to clean | Surface buildup may require more cleaning effort later |
| Waterproof coating | Helps limit surface absorption | Check for trapped moisture around coated sections | Moisture may remain beneath folds or edges |
| Removable insert | Allows separate cleaning access | Clean according to applicable care instructions | Improper cleaning may affect shape or fit |
| Base and stitching | Supports structure and load distribution | Inspect seams and stress points during maintenance | Shape changes or seam wear may affect usability |
Fabric, mesh, plastic, and waterproof surfaces
Fabric, mesh, plastic, and waterproof surfaces change how wiping, brushing, rinsing, and drying time should be handled during cleaning. Fabric weave, mesh openings, plastic panels, and coated layers respond differently to moisture, residue, and stains. Surface type is the main decision factor.
The same organizer may contain different surfaces that need different cleaning actions. The annotated example below helps compare tool choice, moisture tolerance, and drying attention before selecting a cleaning method.
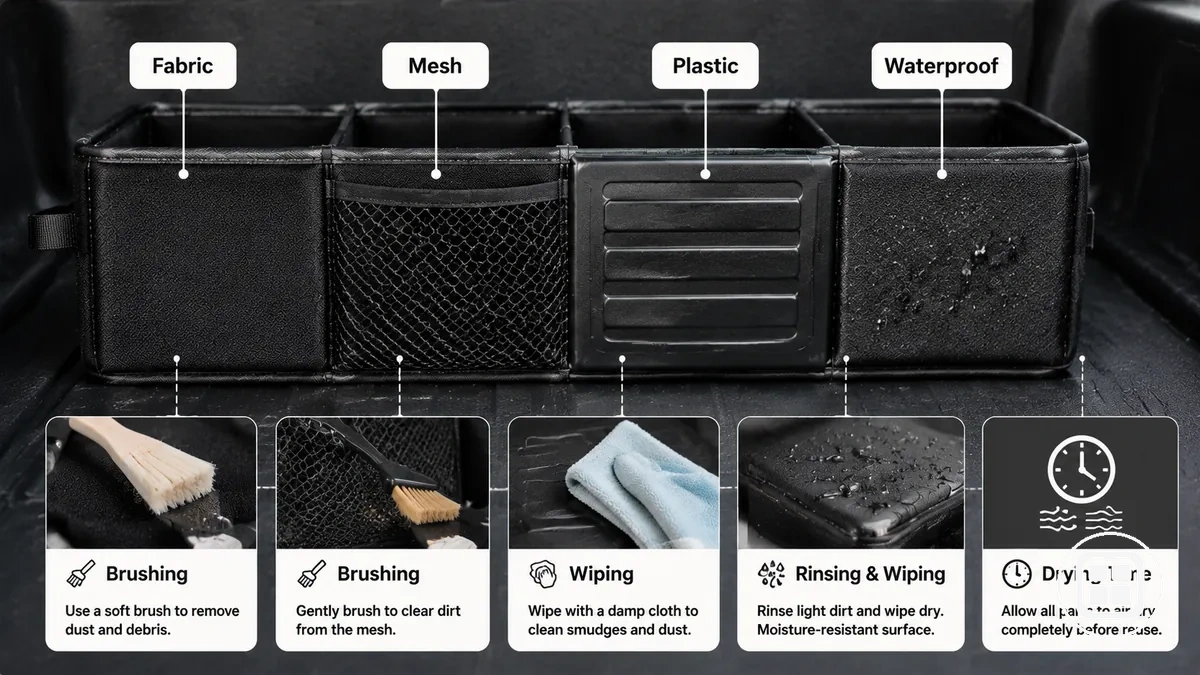
- Fabric weave — use gentle brushing or wiping for stains; allow adequate drying time because moisture may remain in the textile surface.
- Mesh opening — remove crumbs with a brush or light wiping; avoid pushing debris deeper into the net pocket.
- Plastic panel — wipe residue from the surface with a suitable cloth; dried buildup may require more cleaning effort later.
- Waterproof surface — wipe moisture from the coated layer and inspect folds; water resistance does not automatically permit soaking or machine washing without care label support.
- Coated layer or water-resistant layer — use cleaning methods that match the care label; trapped moisture may require additional drying attention after rinsing.
Removable liners, leakproof bases, and washable inserts
Removable liners, leakproof bases, and washable inserts change the cleaning sequence by helping contain residue, spills, and moisture in specific areas. A removable liner or washable insert can often be cleaned separately when the care label allows it, while a leakproof base may help limit spill movement within the organizer. Removable parts should be cleaned separately when safe.
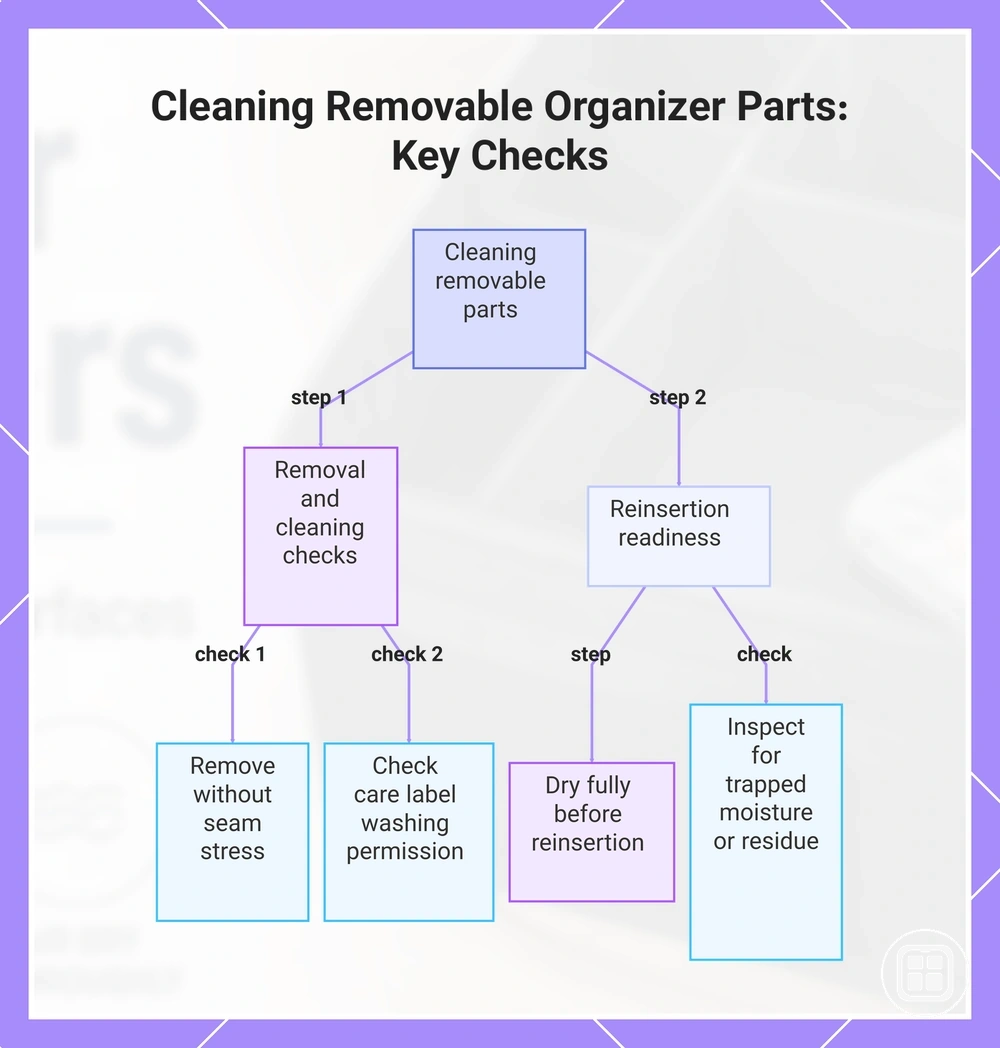
Residue and trapped moisture can remain hidden beneath a liner, around a seam, or near a base layer if those areas are not checked during cleaning. Removing eligible parts, cleaning them separately, allowing complete drying, and verifying reinsertion readiness may help reduce odor, moisture retention, leakage concerns, or panel damage. Use these checks to verify liner-based cleaning decisions before reinsertion.
- Confirm that the removable liner can be removed without stressing seams or attachment points.
- Check whether washing permission is stated on the care label before cleaning a washable insert.
- Allow each removable part to dry fully before reinsertion.
- Inspect the leakproof base and surrounding panel areas for trapped moisture, residue, or signs of leakage before reassembly.
This chart outlines the essential steps and checks for cleaning removable liners, leakproof bases, and washable inserts to reduce odor, moisture retention, and panel damage.
How to clean a car organizer safely
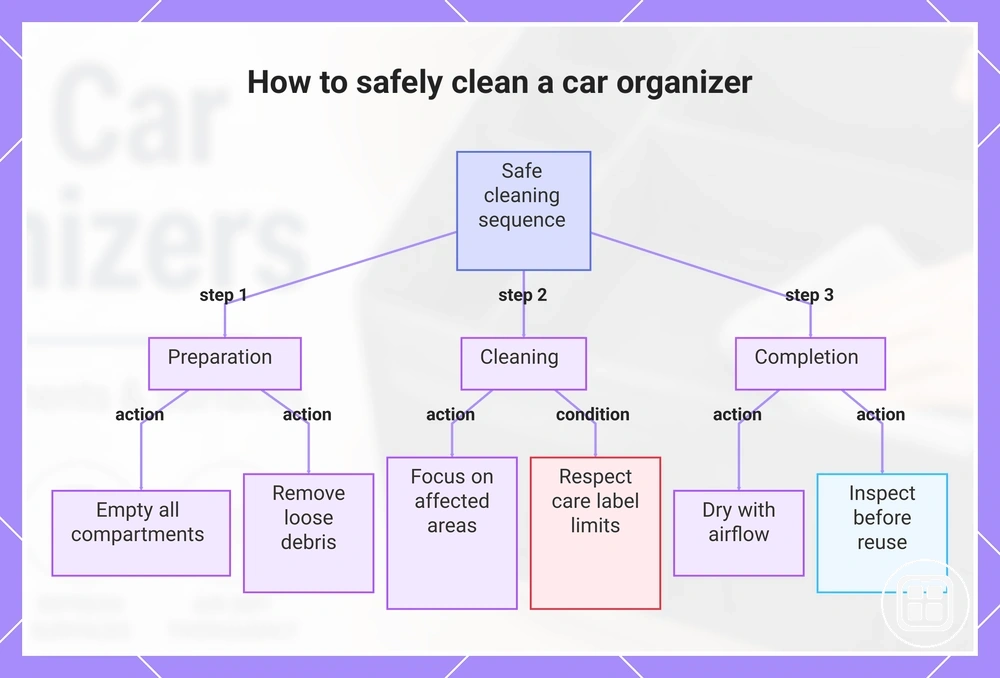
Safe cleaning starts with removing contents, clearing loose debris, cleaning affected areas, allowing drying, and finishing with an inspection. This sequence helps limit moisture retention and reduces the chance of spreading residue between compartments. The safe sequence is empty contents, remove loose debris, clean targeted areas, dry thoroughly, and inspect before reuse.
Moisture, residue, and stains can become harder to manage when wet cleaning begins before debris removal or when drying is incomplete. A structured cleaning sequence helps keep compartments easier to inspect and may reduce odor or moisture-related issues. Cleaning intensity depends on material, the care label, removable parts, and any waterproof coating.
- Empty contents from all compartments before cleaning. Check for removable parts and stop if removal instructions are unclear.
- Remove loose debris from compartments with a soft brush or similar tool. Avoid wet cleaning until loose dirt has been cleared.
- Inspect compartments, seams, and surfaces for a stain or residue buildup. Focus cleaning only on affected areas when possible.
- Use a cloth with a mild solution to wipe down surfaces or spot clean a stain. Mild solution choice may depend on material and care label limits.
- Clean corners, pockets, and compartment edges with a brush or damp cloth when needed. Avoid cleaning methods that exceed the organizer's washing limits.
- Allow drying in an area with suitable airflow before reinstallation. Do not return contents while moisture remains in compartments or removable parts.
- Perform a final inspection of compartments, seams, and removable parts. Deeper washing or machine washing should only be considered when the care label allows it.
This chart shows the safe step-by-step cleaning sequence for a car organizer, including key conditions to avoid damage.
Emptying compartments and removing loose debris
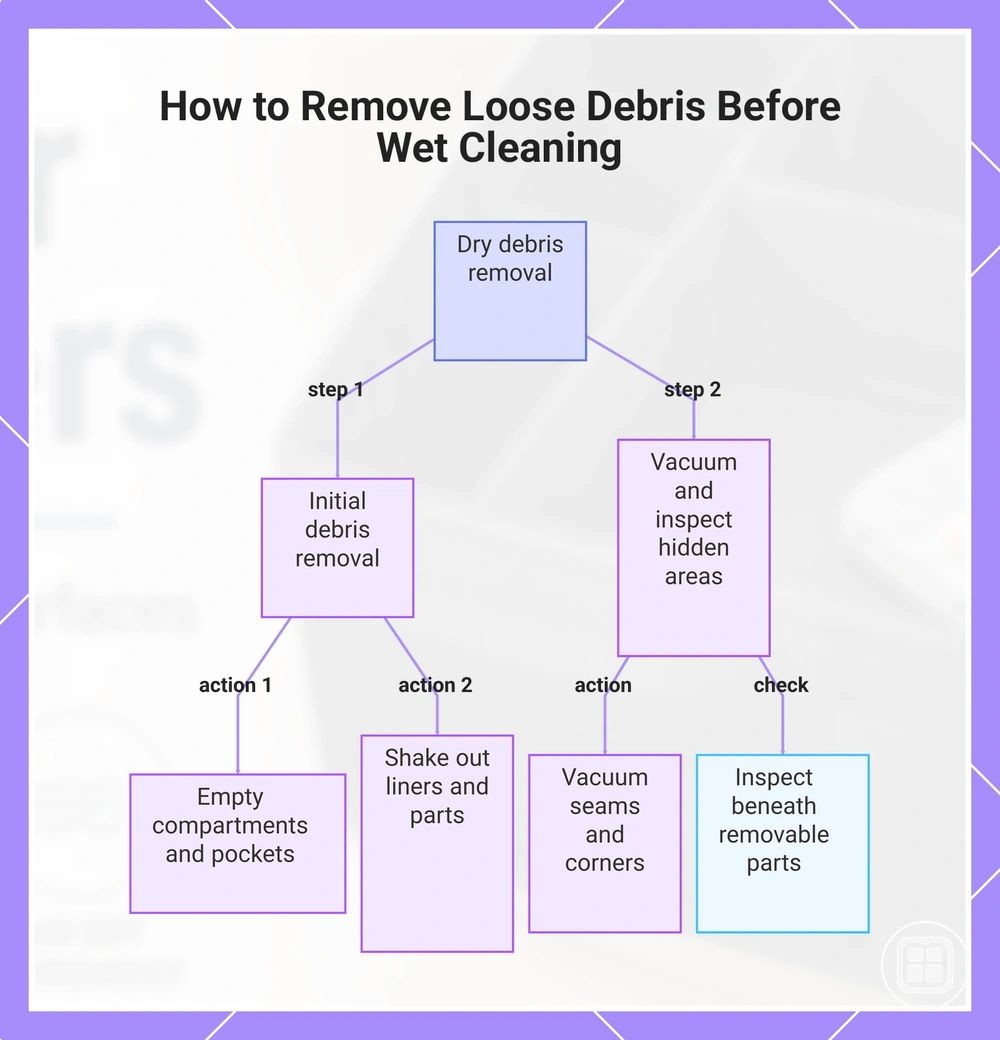
Emptying compartments and removing loose debris starts by removing contents before any wet cleaning begins. Loose debris, crumbs, dirt, and small items can collect in compartments, pockets, seams, corners, and liners where they may affect later wiping or washing. Dry removal comes before wet cleaning because it helps reduce smearing and clears hidden grit.
- Empty compartments and pockets of all small items before cleaning.
- Shake out liners and removable parts when the material allows gentle handling.
- Vacuum seams and corners where crumbs and dry debris tend to collect.
- Check pockets and compartment edges for trapped dirt, then remove it with a vacuum.
- Separate removable parts and inspect for debris that may remain beneath liners or around seams.
This chart shows the two main steps for dry debris removal: emptying compartments and shaking out liners, followed by vacuuming and inspecting hidden areas to prevent smearing during wet cleaning.
Brushing, wiping, and spot cleaning storage areas
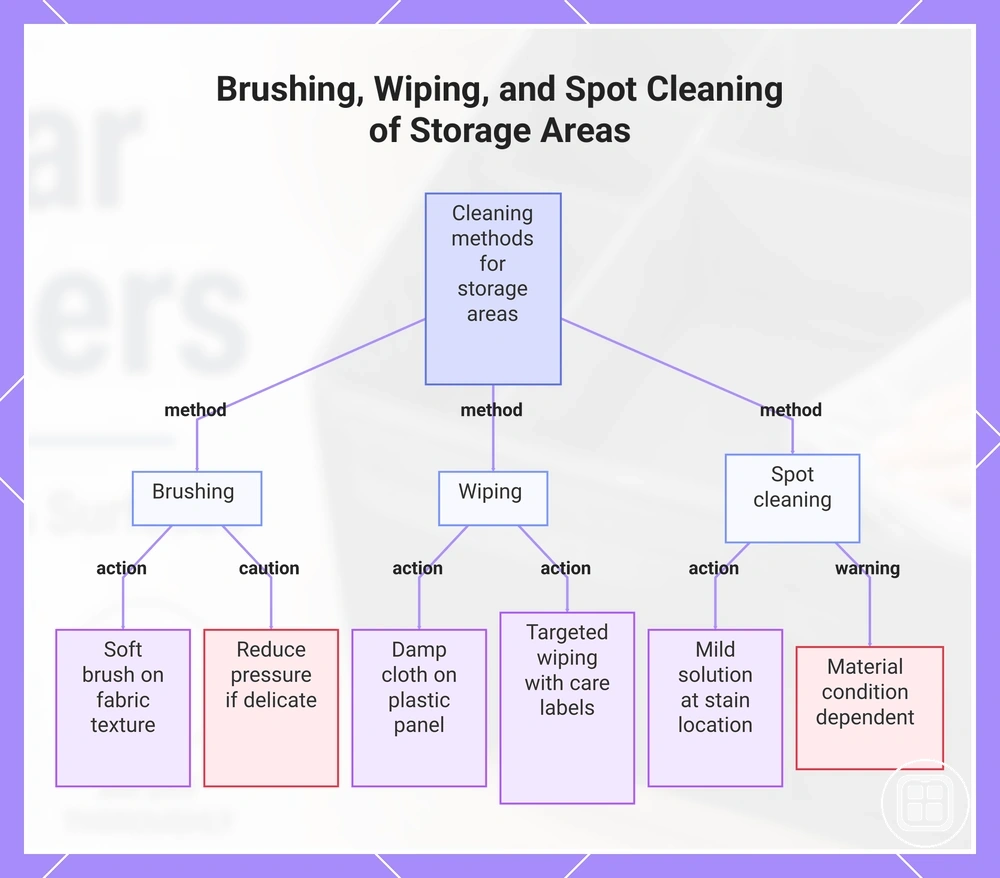
Brushing, wiping, and spot cleaning work best when the tool matches the surface type and residue being removed. Light residue on a fabric texture may respond to a soft brush, while residue on a plastic panel or coated surface may be easier to manage with targeted wiping. Match tool intensity to the surface type to reduce unnecessary wear.
Targeted cleaning starts with the least aggressive method that fits the stain location and residue type. A damp cloth or mild solution may help with localized residue, but moisture should remain controlled because fabric texture, coated surface characteristics, and care label limits can vary.
- Use a soft brush on fabric texture with dry residue; apply gentle pressure and avoid aggressive scrubbing.
- Use a damp cloth on a plastic panel with light surface residue; wipe down the area and avoid excess moisture.
- Use spot cleaning with a mild solution at the stain location when localized residue remains; residue removal may depend on the material and surface condition.
- Use targeted wiping on a coated surface with light residue; follow care label limits because moisture tolerance and damage risk can vary.
- Use a soft brush around textured storage areas where residue is trapped; reduce pressure if the surface appears delicate.
This chart shows the three main cleaning methods for storage areas and their recommended application for different surfaces and residues.
Drying the organizer before returning it to the car
Drying the organizer before returning it to the car means allowing all surfaces and removable parts to dry fully before placing them back into a closed vehicle environment. Adequate airflow helps reduce hidden moisture that can remain after cleaning, while humidity and how wet the organizer became can affect drying time. Trapped moisture can increase odor risk, and wet parts should not be treated as ready for reinstallation. The organizer is ready to return when moisture checks show dry surfaces and stable panel shape.
Use a readiness check to look for hidden moisture before reinstallation:
- Seams — no hidden moisture should remain along stitched areas.
- Liners — dry fully before reinsertion and confirm no damp spots remain.
- Corners — check for trapped water or moisture buildup before reuse.
- Base panels — confirm surfaces are dry and panel shape appears stable.
- Removable parts — reinstall only when moisture checks indicate readiness.
Maintenance habits that keep car organizers usable longer
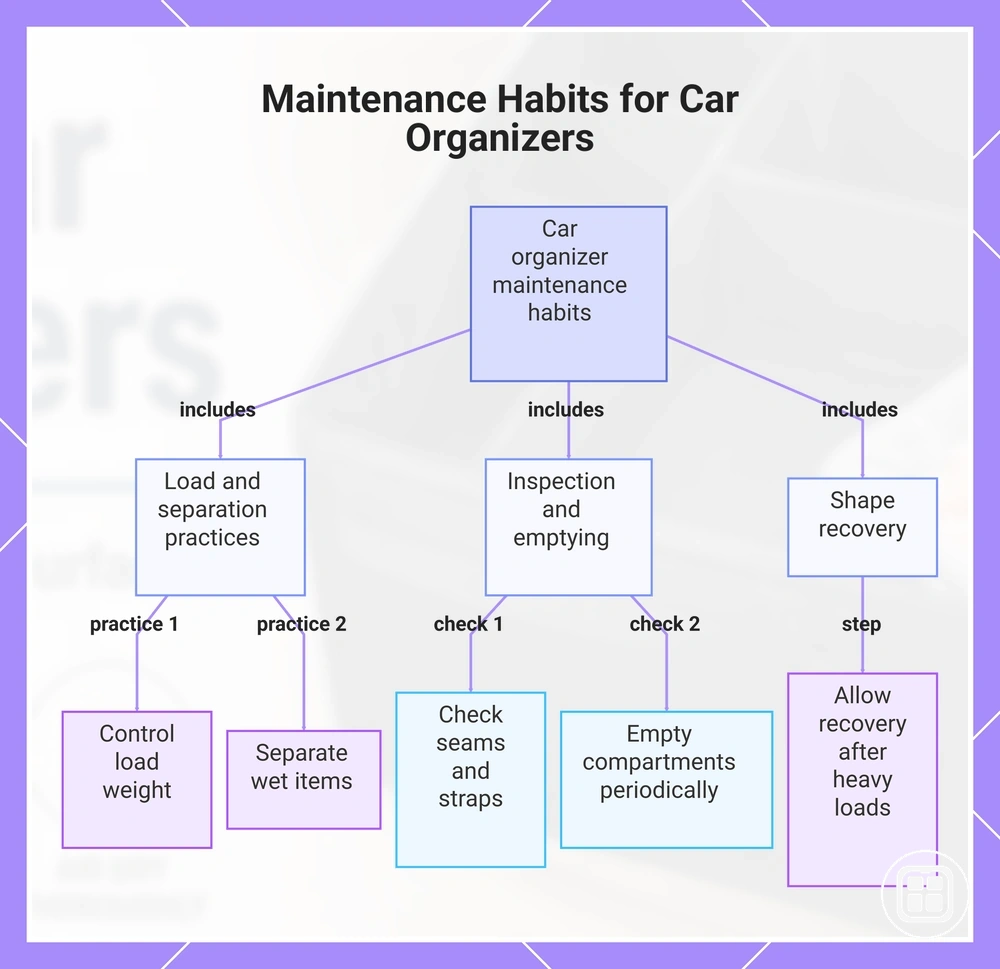
Maintenance habits that keep car organizers usable longer focus on reducing clutter, moisture, residue, and structural stress before they become larger cleaning or usability issues. Load control, item separation, liner use, and periodic emptying help keep compartments easier to maintain and inspect. Regular attention to seams, straps, and compartment shape can reveal early signs of wear before deeper cleaning becomes necessary. Routine upkeep is a prevention practice.
When a car organizer carries damp items, residue-prone contents, or uneven loads, maintenance needs can increase even if the organizer appears clean. Moisture beneath liners, residue inside compartments, and stress on seams may benefit from routine maintenance rather than immediate deeper cleaning. Shape recovery and continued usability can depend on material, load weight, and usage frequency. Ongoing organizer care is easier when repeatable checks become part of a regular check routine.
Use the following checklist to verify ongoing maintenance habits:
- Practice load control to reduce structural stress on compartments, seams, and support areas.
- Use item separation to keep wet or residue-prone items away from cleaner compartments and reduce clutter buildup.
- Check liner use regularly to help limit moisture contact and reduce odor-related concerns.
- Empty compartments periodically to remove hidden residue and make inspection easier.
- Perform seam checks to identify wear that may affect continued usability.
- Perform strap checks to monitor attachment points and signs of stress during regular use.
- Allow compartment shape recovery after heavy loads when compression or distortion is visible.
This chart shows the key maintenance habits that help keep car organizers usable longer, including load control, inspections, and shape recovery.
Reducing clutter, residue, moisture, and odor buildup
Clutter, residue, moisture, and odor buildup can increase when recurring messes remain inside compartments. Food items, wet objects, spills, and compartment crowding make buildup harder to notice and manage over time. Preventing buildup through simple habits helps reduce maintenance burden.
- Remove food items from compartments after use to reduce residue buildup and lower odor buildup risk.
- Separate wet objects from other contents to limit moisture transfer and reduce dampness inside storage areas.
- Use a quick wipe on fresh spills to reduce residue accumulation on liners and compartment surfaces.
- Avoid compartment crowding to improve access and make clutter easier to identify before buildup develops.
- Airing the organizer when moisture is present may help reduce odor buildup, depending on material and stored item type.
- Review stored item type regularly and remove damp items or unused cleaning supplies that can increase maintenance burden.
Checking seams, straps, liners, and compartment shape
Checking seams, straps, liners, and compartment shape helps identify wear that can affect organizer function after repeated use and cleaning. Visible looseness, tearing, deformation, or trapped residue can indicate whether maintenance attention is needed. This inspection identifies wear before it affects storage.
Use the following inspection checklist to support a maintenance decision:
- Inspect seams and stitching for wear or tearing; visible damage may serve as a repair cue before storage performance declines.
- Check straps and fasteners for looseness or wear; continued usability can be affected when attachment points no longer hold their intended position.
- Examine liners or insert components for trapped residue; remaining buildup may contribute to odor concerns and indicate additional cleaning is needed.
- Review compartment shape and panel shape for deformation; changes after repeated loading may influence whether continued use or replacement becomes the better maintenance decision.
- Compare visible wear across seams, liners, and compartment panels; localized conditions help determine whether cleaning, monitoring, repair, or replacement should be considered.
Cleaning mistakes that can weaken car organizers
When a car organizer shows panel distortion, seam wear, lingering moisture, or cleaning-related weakening, one or more cleaning mistakes may be contributing factors. Over-soaking, harsh chemicals, hard scrubbing, machine washing without care-label support, poor drying, and overloaded reassembly can place additional stress on materials and construction. Outcomes depend on material, coating, panel design, and cleaning intensity. These cleaning mistakes increase risk rather than guarantee damage.
Normal wear can develop through regular use, while preventable cleaning-related weakening is often linked to excessive moisture, abrasive cleaning, or ignoring a care label. The table below organizes each cleaning mistake by affected part, likely risk, and safer alternative.
| Cleaning mistake | Affected part | Likely risk | Safer alternative |
|---|---|---|---|
| Over-soaking | Panels and structural layers | Excessive moisture may increase warping risk or affect panel shape | Use controlled wiping and allow thorough drying |
| Harsh chemicals | Coating and surface materials | Discoloration or surface deterioration may occur depending on material | Use a material-appropriate cleaner |
| Hard scrubbing | Fabric surfaces and seams | Wear or seam stress may increase with abrasive cleaning | Use gentle brushing or targeted wiping |
| Machine washing without care-label support | Removable parts, stitching, and seams | Damage risk may increase when cleaning exceeds care label guidance | Perform a label check before machine washing |
| Poor drying | Liners, seams, and interior surfaces | Residual moisture may contribute to odor concerns or material stress | Allow adequate airflow and drying time before reuse |
| Overloaded reassembly | Compartment panels and seams | Deformation or added wear may develop after cleaning | Return contents gradually and monitor compartment shape |
Common maintenance issues after spills, moisture, or heavy use
When odor, stains, panel changes, or cleaning-related wear appear after use, the likely cause is often unremoved residue, trapped moisture, repeated load stress, or delayed spill cleaning. Spills can leave residue that continues affecting surfaces after visible cleanup, while moisture may remain hidden in seams, liners, or layered materials. Heavy use can place repeated stress on seams and panel shape, especially when weight is concentrated in specific compartments. Common symptoms often point toward identifiable causes involving residue, trapped moisture, load stress, or spills.
Maintenance response becomes easier when each symptom is separated from its likely cause and inspection target. The diagnostic table below connects observable symptoms to a likely attribute issue, a practical check, and what the condition may mean.
| Symptom | Likely attribute issue | Check | What it means |
|---|---|---|---|
| Returning odor | Trapped moisture or residual contamination | Inspect seams, liners, and enclosed compartments for dampness | A recurring smell may indicate moisture or residue remains after cleaning |
| Reappearing stains | Residual spill material beneath the surface | Check the stained area and nearby layers for remaining residue | Stains may return when residue was not fully removed during cleaning |
| Liner residue | Accumulated debris or spill remnants | Inspect removable liners and hidden contact areas | Residue buildup may indicate additional cleaning attention is needed |
| Softened panels | Moisture exposure or material stress | Check panel shape, firmness, and drying condition | Panel changes may be associated with prolonged moisture exposure or repeated use |
| Visible seam wear | Load stress from heavy use | Inspect seams and stitching for stretching or wear | Repeated use may increase stress on support areas and affect usability |
When to clean, repair, or replace a car organizer
When stains, odor, torn seams, broken straps, warped panels, damaged liners, persistent moisture, or unstable storage behavior appear, the appropriate action depends on condition, hygiene, structure, and continued usability. Routine cleaning addresses removable residue and hygiene concerns, while a repair may be appropriate when localized damage affects function without compromising the overall structure. Replacement may be considered when structural damage, persistent condition problems, or usability concerns remain despite maintenance efforts. Clean, repair, and replace are different outcomes based on condition signals.
| Condition signal | Clean | Repair | Replace | Decision note |
|---|---|---|---|---|
| Stains | Yes | No | Usually no | Routine cleaning may address hygiene and appearance concerns |
| Odor | Yes | No | Possible if persistent | Persistent odor may indicate trapped moisture or remaining residue |
| Torn seams | No | Yes | Possible if extensive | A repair cue depends on severity and continued usability |
| Broken straps | No | Yes | Possible if function is significantly affected | A minor fix may restore usability when damage is localized |
| Warped panels | No | Sometimes | Possible | Structural changes may affect storage stability and condition |
| Damaged liners | Sometimes | Sometimes | Possible | The decision depends on liner condition and hygiene concerns |
| Persistent moisture | Yes | No | Possible if condition remains unresolved | Moisture concerns may affect hygiene and material condition |
| Unstable storage behavior | No | Sometimes | Possible | Continued usability depends on the source and severity of the condition |
Condition signals help separate routine cleaning needs from repair cues and replacement decisions. Stains, odor, and persistent moisture often point toward cleaning-related actions, while torn seams and broken straps may indicate repair opportunities. Warped panels, damaged liners, and unstable storage behavior may require a broader assessment because structure and usability can vary by severity. These condition signals help guide the decision.
When washable, waterproof, fabric, leakproof, or removable-liner attributes are present, the same condition signal may lead to a different outcome. A removable liner may support additional cleaning, while waterproof or leakproof construction may influence how persistent moisture is evaluated. Fabric surfaces may retain stains or odor differently than other materials, so the decision can depend on condition history and hygiene concerns. For broader category guidance, return to Back to hub overview.
Here are product examples that may make comparison easier. Before buying, always review the compatibility criteria, essential features, and product details.