Car Organizer Installation and Securing
Car organizer installation is the process of placing a storage organizer in a suitable vehicle area and securing it so the position supports fit, access, load balance, and normal driving use. The process includes checking placement before tightening, matching straps or a non-slip base to the contact surface, and using an available anchor point only when the organizer design and vehicle space allow it. Car organizer installation should lead to stability as the main outcome.
Slipping, poor fit, and blocked access often happen when the organizer sits on the wrong surface, carries uneven weight, or uses a securing method that does not match the vehicle area. Straps, buckles, a non-slip base, and load balance can reduce movement risk when used with suitable tension and clear access. This guidance covers installation and securing only, not buying advice, full fit-size selection, or deep troubleshooting. Stability still depends on organizer type, anchor availability, surface texture, strap design, and carried items.
To install a car organizer properly, first choose a reachable placement, then check fit, secure the organizer, and confirm that the load position does not create obstruction. Later sections explain the practical checks by vehicle area, securing method, load position, and safety condition without treating every organizer as the same. Start with the placement basics before tightening anything into place.
Car Organizer Placement and Securing Basics
Car organizer placement and securing basics means matching a car organizer to a vehicle area where it can sit securely and remain reachable during normal use. Placement affects both access and stability because the contact surface, attachment point, and available space influence movement risk. A suitable vehicle area creates the conditions needed for stable placement before installation begins.
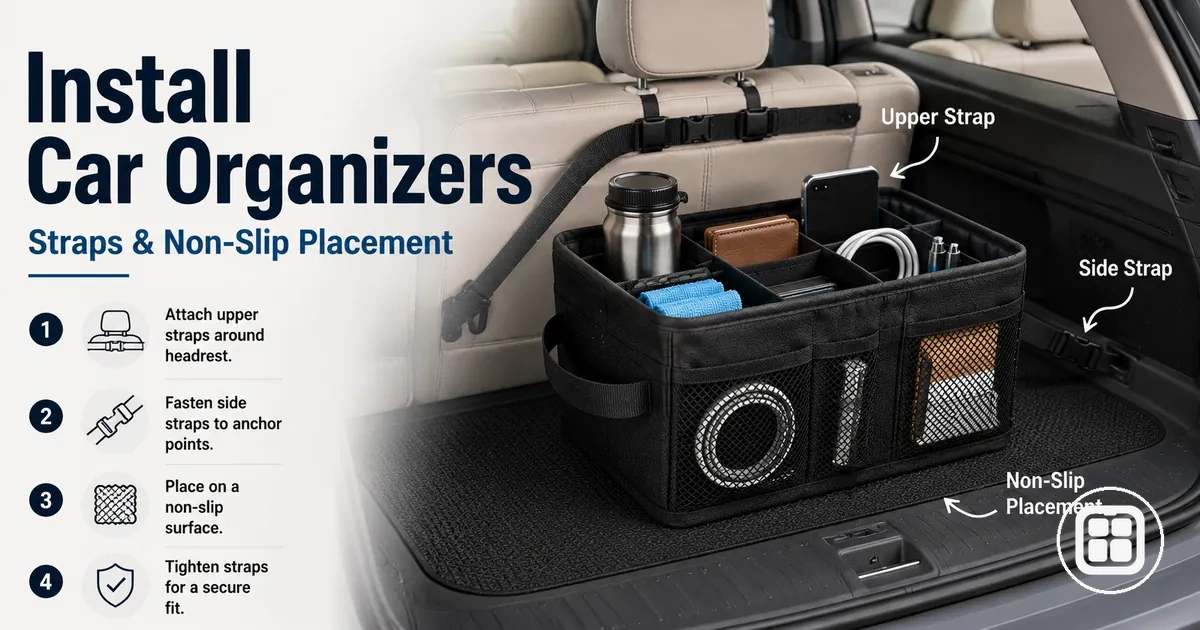
Car Organizer Placement and Securing Basics focuses on selecting a position that supports reachability, contact with the surface, and access to stored items. The image below clarifies how vehicle area, organizer position, contact surface, attachment point, and access path relate to securing basics before detailed installation begins.
A trunk organizer may benefit from a broad contact surface and an available anchor point. A backseat organizer often depends on reachability and passenger-space considerations. A console-area organizer can be easier to access but still requires a stable location. The suitability of any position depends on the vehicle area, surface grip, anchor availability, and carried items.
Placement basics organize the conditions that help determine whether a location is suitable before securing begins.
- Secure enough: The contact surface should provide sufficient grip or support to help reduce movement risk.
- Reachable enough: Access should remain practical without making stored items difficult to reach.
- Stable enough: A strap, buckle, or attachment point can improve stability when available.
- Not obstructive: The organizer should not interfere with driver controls, passenger space, or normal vehicle use.
- Position-aware: The selected vehicle area should suit the organizer layout and expected load.
These placement and securing basics support installation planning, but they do not replace fit, size, or buying guidance. For the broader topic structure, return to Back to hub overview.
Fit, Surface, and Anchor Checks Before Installation
Fit, surface, and anchor checks before installation depend on verifying vehicle space, contact conditions, and available anchors before any straps or non-slip parts are tightened. A car organizer should be checked against the intended location to help reduce slipping, poor fit, and blocked access. These conditions should be verified before tightening because the installation decision depends on the results of the check.
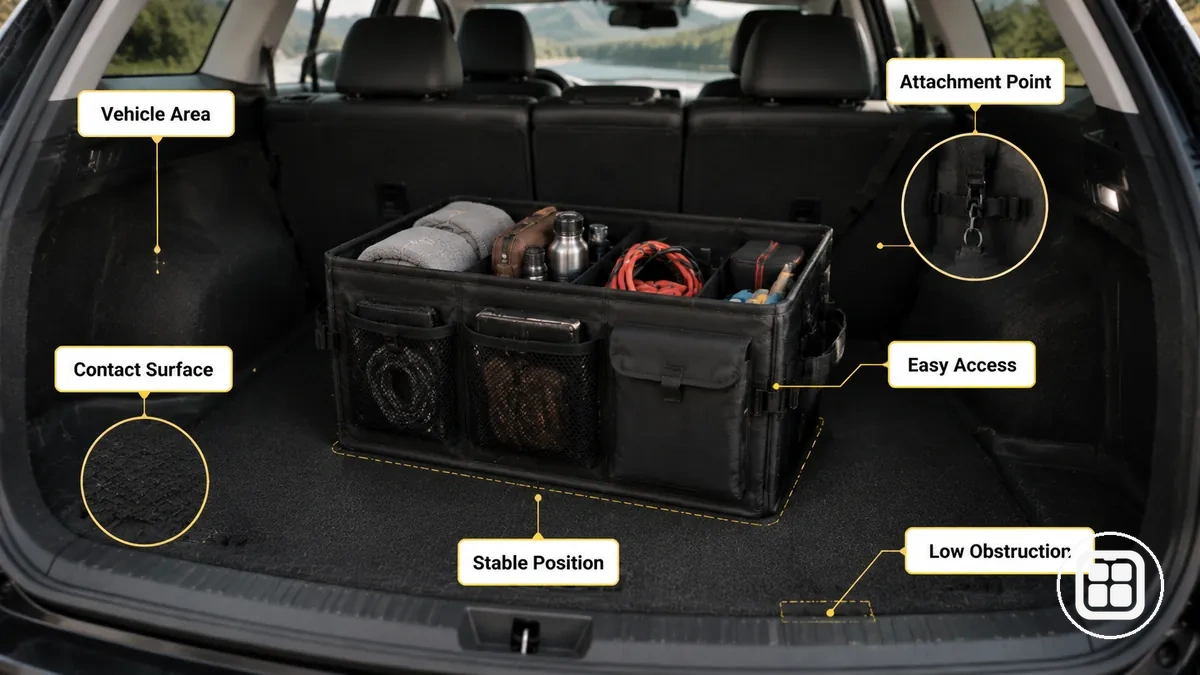
Fit, Surface, and Anchor Checks Before Installation helps verify whether the organizer and vehicle area can work together under normal use. The image below highlights vehicle space, contact surface, strap or buckle position, and anchor point conditions that should be reviewed before securing begins.
A fit check starts with available vehicle space and clearance around the organizer. In a trunk, seatback, headrest area, front seat area, or console area, organizer size may influence access and positioning. Limited clearance can increase blocked access or make securing more difficult. Fit conditions vary by organizer design and vehicle layout.
Surface and anchor conditions affect how the organizer interacts with the chosen location. Surface texture can influence grip, while a Velcro panel or non-slip surface may perform differently depending on the contact area. Strap length, buckle position, and anchor availability affect tension and attachment options. These conditions can change the installation decision when movement risk remains high or attachment points are limited.
The following pre-installation checks help verify whether installation should proceed under the current conditions.
- Organizer size: Compare the organizer footprint with available vehicle space to confirm sufficient clearance and access.
- Base material: Check whether the base contacts the surface evenly, as uneven contact may increase stability risk.
- Surface condition: Review the grip surface, Velcro area, or non-slip surface to determine whether movement risk may remain.
- Strap length: Confirm that strap length can reach the intended anchor without excessive tension or slack.
- Buckle position: Check whether buckle placement supports securing without creating blocked access.
- Anchor point: Verify that an available anchor supports the chosen attachment method before installation begins.
These checks can reduce fit and stability risk, but they cannot confirm universal compatibility because vehicle space, surface conditions, and anchor availability vary by installation location.
Installing Car Organizers by Vehicle Area
Installing car organizers by vehicle area starts with choosing the intended location and adapting the installation process to the surface, anchor point, movement pattern, and access needs of that vehicle area. The same sequence applies in a trunk, backseat, headrest, front seat, or console location, but attachment conditions and available supports may differ. Vehicle area determines how the installation process should be adjusted.
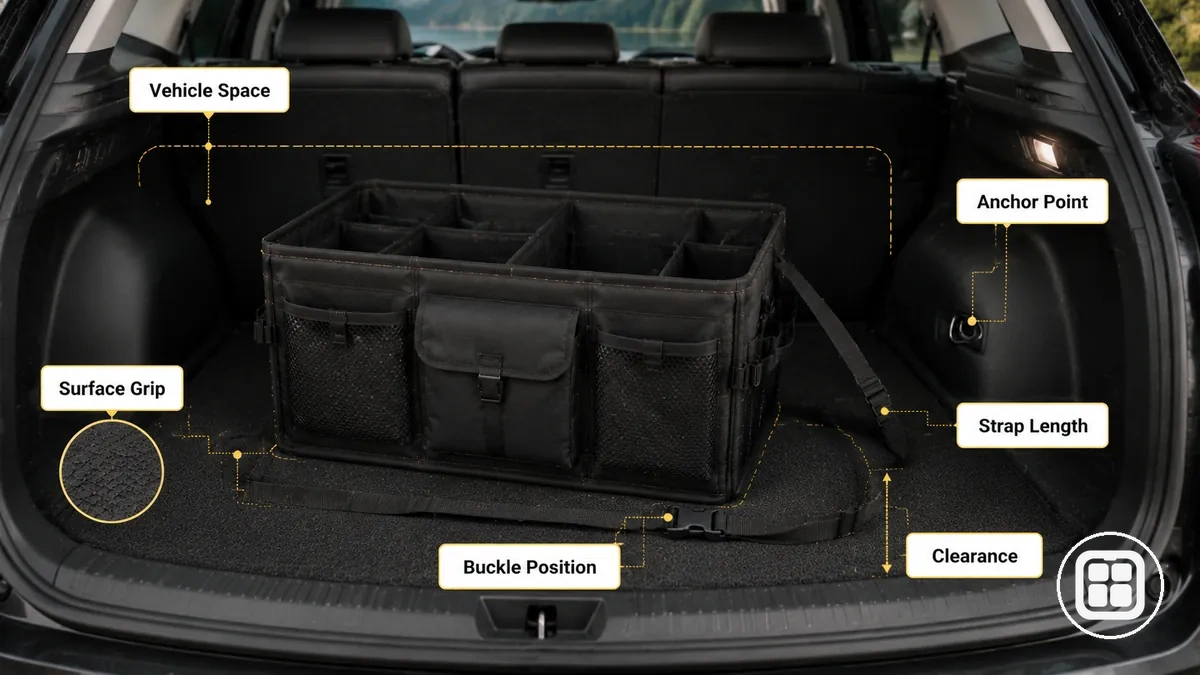
Installing Car Organizers by Vehicle Area follows a shared process that adapts to differences in surface contact, anchor point availability, and access needs. The image below demonstrates organizer orientation, strap attachment, tightening points, access checks, and a light load test across placement areas.
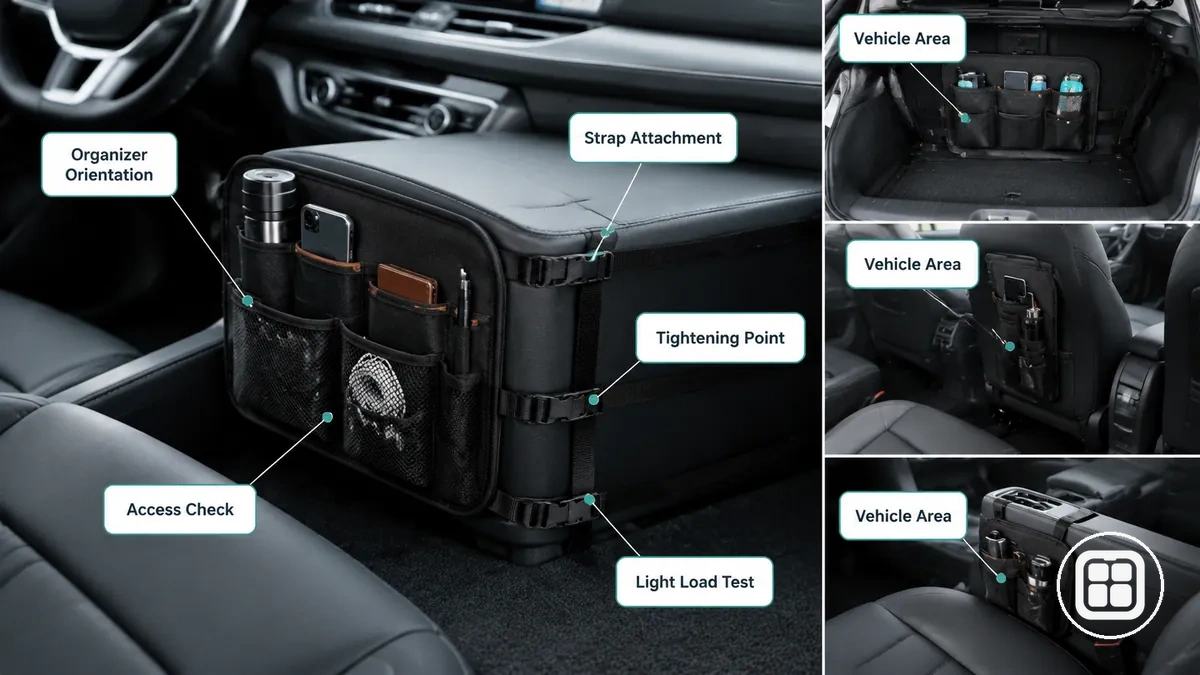
- Place the organizer: Position the organizer in the selected vehicle area and check that the location supports installation without creating blocked access.
- Test orientation: Adjust orientation and confirm that storage compartments remain accessible in the intended position.
- Attach straps or supports: Connect straps, buckles, or supports to an available anchor point when the placement area allows secure attachment.
- Tighten carefully: Apply tension gradually and check that tightening does not distort the organizer or shift its position.
- Check access: Verify that access remains practical and that the organizer does not interfere with normal use of the surrounding vehicle area.
- Perform a light load test: Add a light load and test for movement. Adjust straps, supports, or orientation if noticeable movement remains under the test condition.
A trunk installation may rely more on floor contact and anchor availability, while a backseat or headrest installation may depend more on strap routing and attachment position. A front seat or console installation may require additional attention to access and surrounding clearance. The same installation sequence applies, but conditions vary by vehicle area.
These shared installation steps establish the installation process before moving into area-specific details. The following subsections focus on how local vehicle-area conditions can affect the same sequence of placing, orienting, attaching, tightening, checking access, and completing a light load test.
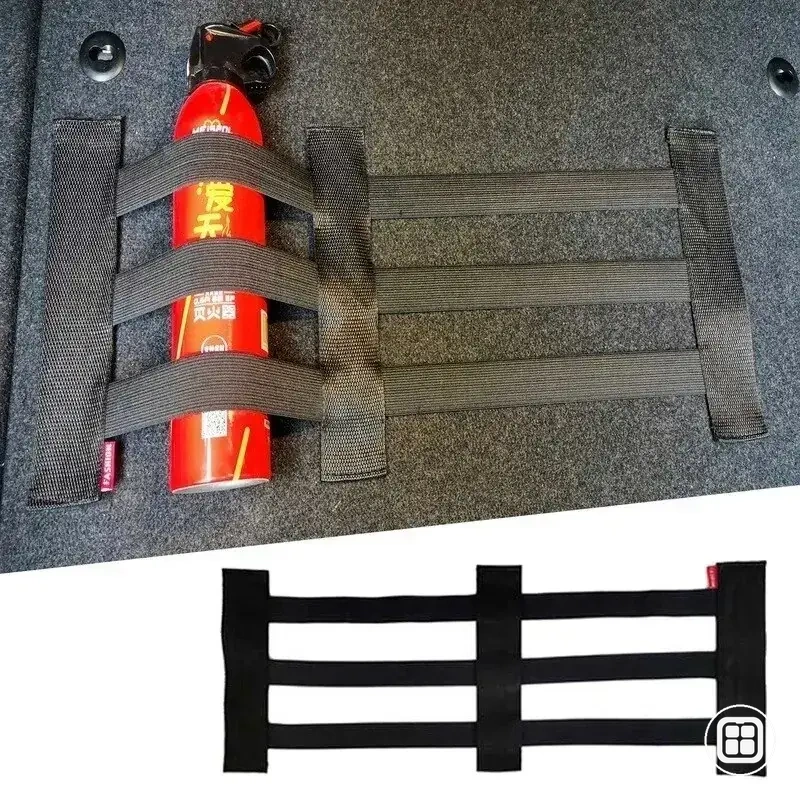
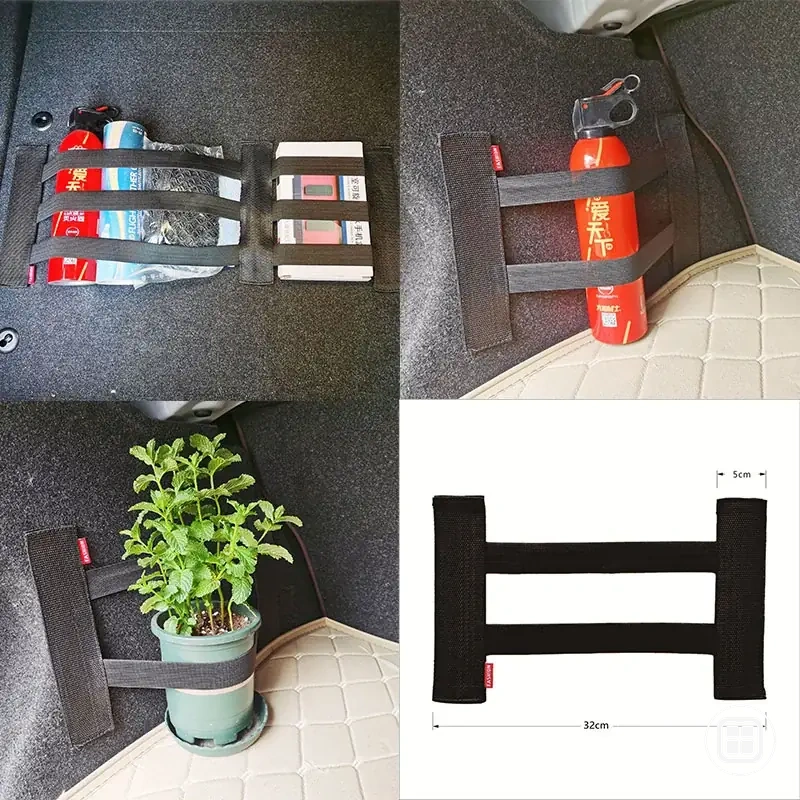
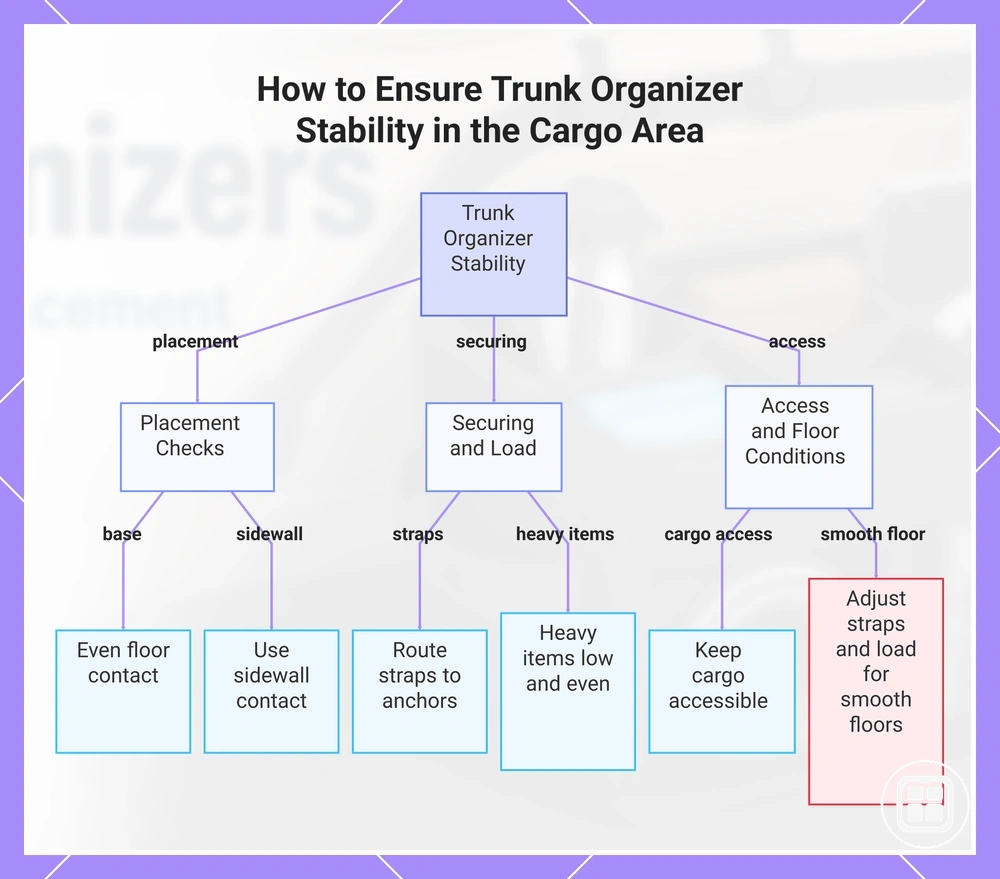
Trunk and Cargo Area Organizers
Trunk and cargo area organizer installation starts with positioning the trunk organizer on a stable cargo floor and checking how the organizer base interacts with floor texture and surrounding surfaces. A trunk organizer that maintains good cargo floor contact and benefits from sidewall contact may reduce sliding during turns, braking, and loading, although results depend on floor texture, securing straps, load balance, and driving movement. The installation goal is improved trunk stability within the cargo area.
The following checks help support trunk organizer stability in the cargo area:
- Base placement: Position the organizer base so it sits evenly on the cargo floor and maintains consistent surface contact.
- Sidewall contact: Use sidewall contact when available to help limit movement across the trunk area.
- Securing straps: Route securing straps to suitable anchor points and adjust strap tension without distorting the organizer.
- Heavy items: Place heavy items low and distribute weight evenly to support load balance during braking and cornering.
- Access check: Keep spare tools, emergency items, or similar cargo accessible without disrupting load balance.
When the cargo floor has a smoother texture or limited sidewall contact, sliding may depend more on securing straps, strap route, and load balance. In these conditions, small adjustments to heavy-item placement and strap tension can help reduce movement across the cargo area.
This chart shows the main checks and adjustments to reduce sliding and improve trunk organizer stability in the cargo area.
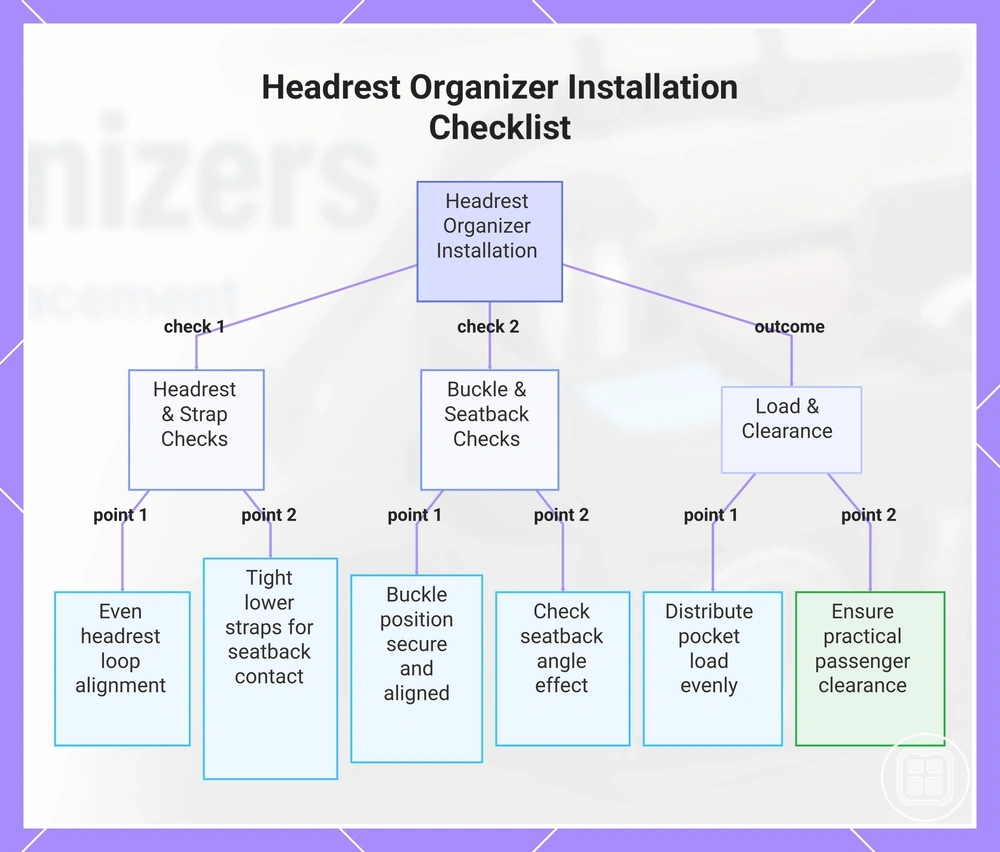
Backseat and Headrest Organizers
Backseat and headrest organizer installation starts with aligning the headrest organizer to the headrest posts and adjusting strap tension so the organizer maintains stable seatback contact. Stability depends on headrest-post alignment, lower straps, seatback angle, pocket load, and buckle position rather than strap tension alone. The installation goal is secure attachment with adequate passenger clearance and consistent strap stability.
The following checklist helps verify a secure seatback setup:
- Headrest posts: Check that headrest loops align evenly around the headrest posts and support balanced strap tension.
- Lower straps: Tighten lower straps so the backseat organizer maintains consistent seatback contact with limited movement.
- Buckle position: Confirm that buckle position supports secure attachment and remains properly aligned during seat use.
- Seatback angle: Check whether the seatback angle affects organizer position, strap tension, or hanging alignment.
- Pocket load: Distribute pocket load evenly, as loaded pockets or tablet-holder weight may influence stability depending on strap tension and organizer layout.
Passenger clearance should remain practical after installation. If pocket load increases or the organizer extends farther from the seatback, knee-room, passenger comfort, and seat movement may depend on the amount of weight carried and the available clearance behind the seat.
This chart shows the key checks and outcome for installing a backseat and headrest organizer securely, covering alignment, strap tension, seatback angle, pocket load, and passenger clearance.
Front Seat and Console Organizers
Front seat and console organizer placement starts with preserving clear driver access to gear controls, cup holders, and seat adjustment mechanisms. A front seat organizer or console organizer is suitable only when reachability, passenger space, and control clearance remain unobstructed. The installation goal is accessible storage with controlled obstruction risk.
A front seat organizer placed in the seat gap should maintain stable console contact or support from a wedge support or strap support when the vehicle layout allows it. A console organizer should not interfere with gear controls, cup holders, or seat adjustment movement. Item weight, organizer size, and seat gap dimensions can influence positioning and obstruction risk. The following checks help verify suitable placement:
- Seat gap: Check that the organizer remains positioned within the seat gap without shifting toward control areas.
- Console contact: Confirm that console contact does not interfere with gear controls, cup holders, or seat adjustment access.
- Support check: Verify that wedge support or strap support helps maintain position based on organizer weight and vehicle layout.
Reachable storage can make items easier to access, but a placement that draws attention away from driving may increase distraction. If item weight increases or the organizer extends farther into the cabin, obstruction risk may depend on available space, control layout, and driver access requirements.
This chart shows the three key checks to verify suitable front seat and console organizer placement, ensuring control clearance and driver access.

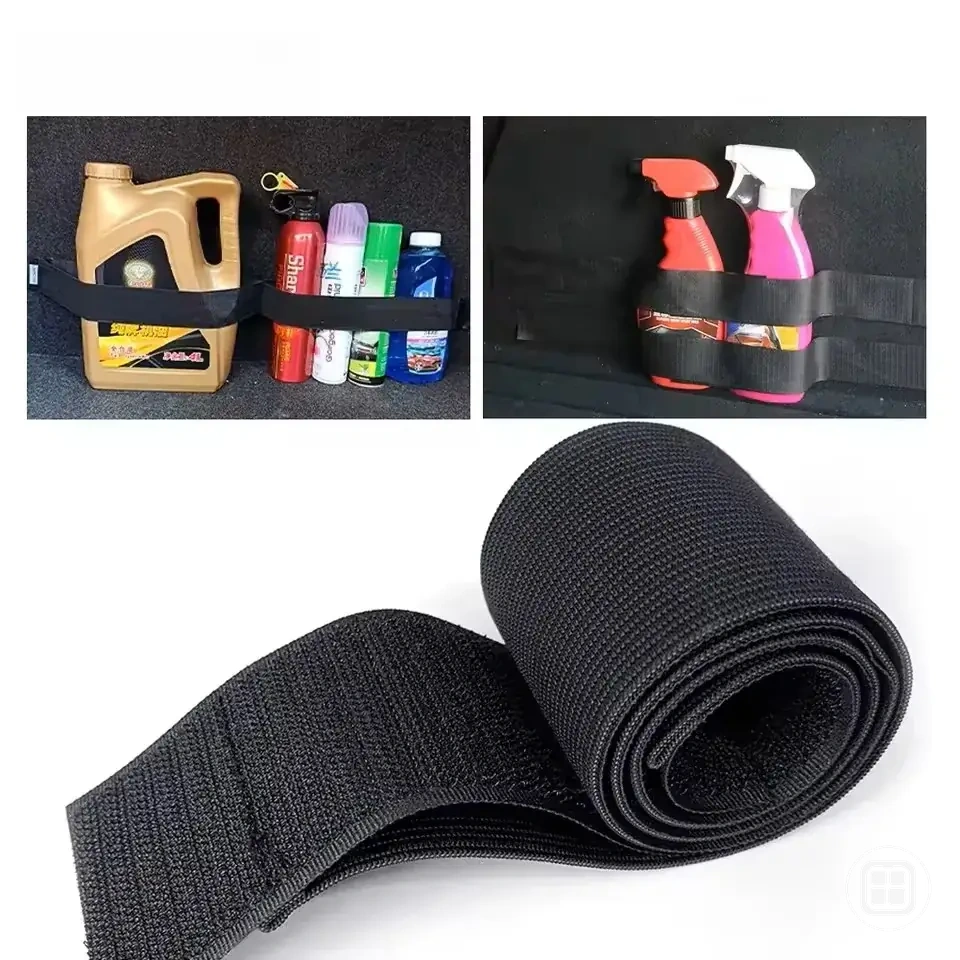
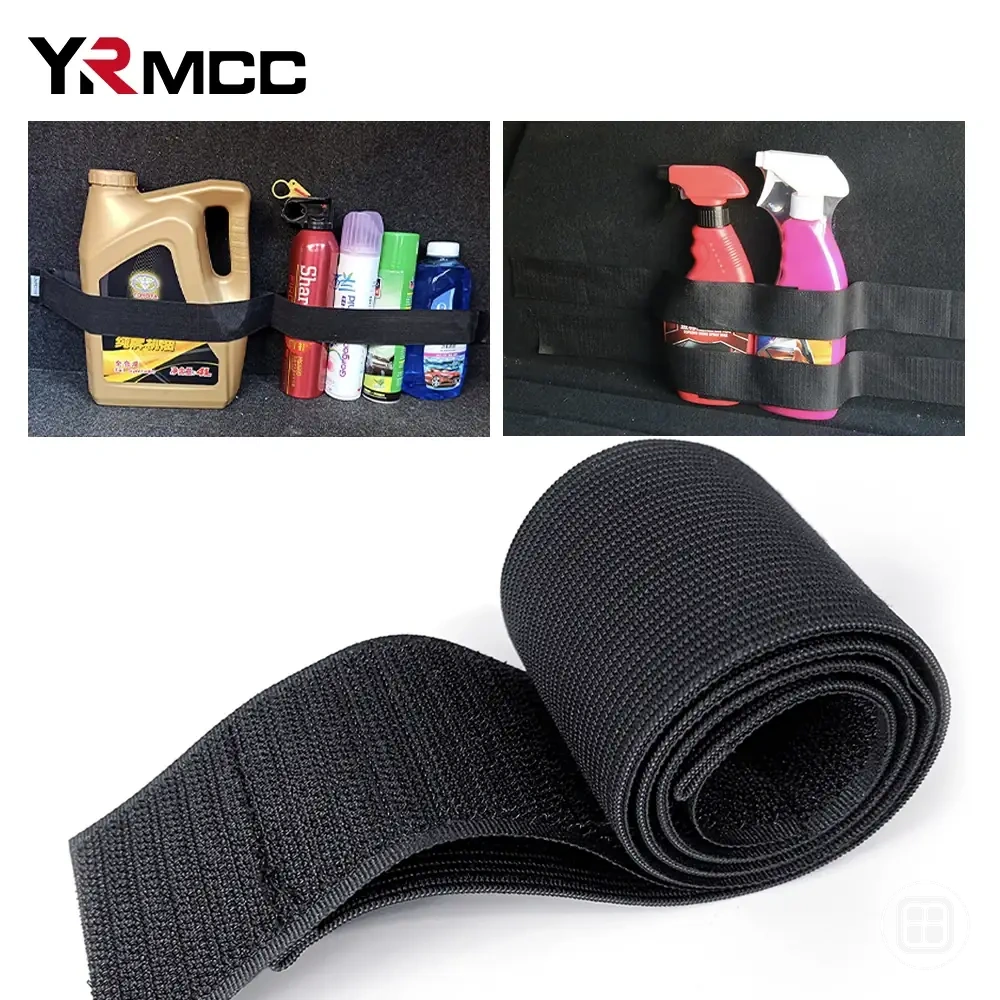
Securing Methods for Straps, Buckles, Velcro, and Non-Slip Bases
Securing methods for straps, buckles, Velcro, and non-slip bases are attachment methods that control organizer movement through tension or grip. Different securing methods perform differently because organizer design, contact surface, anchor availability, adjustability, and expected load can change the result. Effective installation depends on method-condition fit.
Securing Methods for Straps, Buckles, Velcro, and Non-Slip Bases differ by attachment point, grip mechanism, adjustability, and failure risk. The comparison below highlights how each method relates to installation conditions rather than presenting a universally superior option.
| Method | Works best when | Main limitation | Installation check |
|---|---|---|---|
| Straps | An anchor point is available and tension can be adjusted | Movement may increase if tension loosens | Check strap route and tension |
| Buckles | Straps require adjustability and secure fastening | Incorrect buckle position may reduce holding ability | Check buckle engagement and alignment |
| Velcro | A compatible fabric surface supports grip | Grip may vary by contact surface and load | Check surface contact area |
| Rubberized base | A flat contact surface supports friction-based grip | Sliding may still occur under higher load or movement | Check base contact with the surface |
| Anti-slip pad | Additional grip support is needed between surfaces | Performance may depend on surface texture and weight | Check pad placement and coverage |
Straps and buckles work through tension. Straps connect the organizer to an anchor point, while buckles provide adjustability and help maintain the selected tension level. When anchor availability, load, and organizer design match the installation setup, straps and buckles can help control movement that grip-based methods alone may not fully address.
Velcro, a non-slip base, a rubberized base, and an anti-slip pad work through grip at the contact surface. Velcro depends on suitable fabric contact, while a rubberized base or anti-slip pad depends on surface characteristics and load conditions. Each method can help reduce sliding, but the stability effect and failure risk depend on the contact surface, organizer position, and expected load.
Combined securing methods may be useful when both tension control and grip support are needed. Straps can help manage movement through tension, while a non-slip base or anti-slip pad can improve grip at the contact surface. Whether both methods are beneficial depends on organizer design, surface conditions, anchor availability, and load requirements.
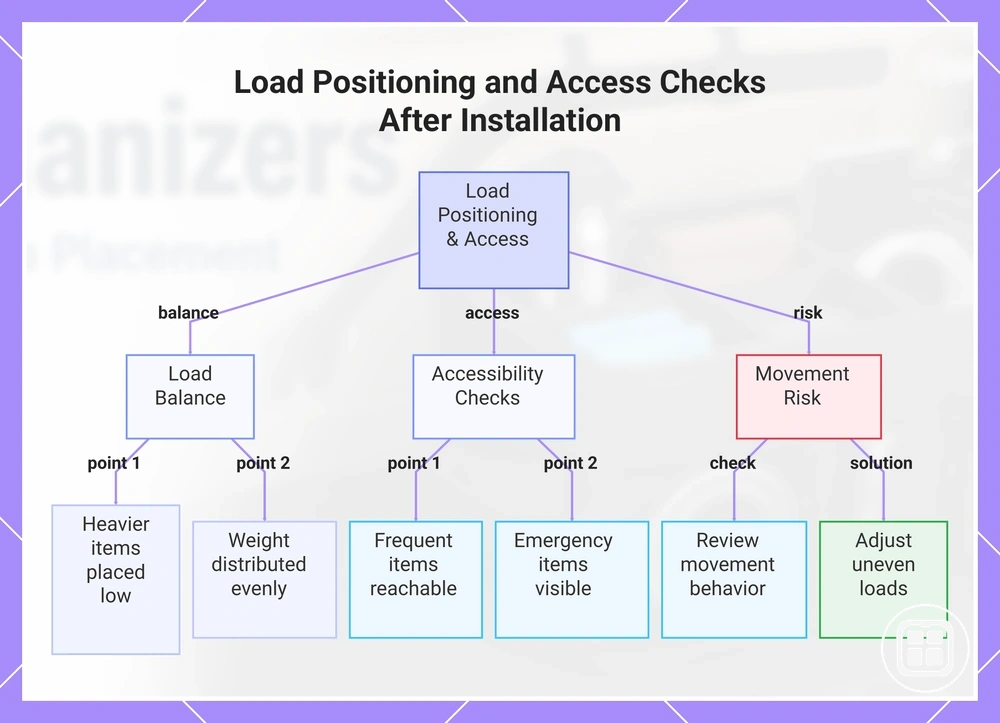
Load Positioning and Access After Installation
Load positioning and access after installation start with verifying that the organizer remains stable with expected contents inside it and that stored items remain reachable without unsafe reaching. Installation is not complete if the organizer becomes unstable only after loading. Load Positioning and Access After Installation verifies load balance, access, and movement risk under normal use conditions.
- Item weight: Place heavier items lower where practical to help manage center of gravity and reduce sliding risk.
- Compartment distribution: Distribute item weight across compartments to support load balance rather than concentrating weight in one area.
- Frequently used items: Keep frequently used items in locations that support reachability without encouraging unsafe reaching.
- Emergency items: Verify that emergency items remain visible and accessible when retrieval may be needed.
- Lid access: Check that lid access remains unobstructed after loading.
- Pocket access: Confirm that pockets remain usable without overloading one side of the organizer.
- Movement check: Review whether load positioning changes movement behavior during normal driving conditions.
Item weight and compartment distribution affect how the organizer behaves after installation. A higher center of gravity or uneven load balance may increase movement risk depending on compartment design, load height, and driving conditions. When heavy items are grouped on one side, adjusting item placement can help improve balance and reduce sliding risk.
Access depends on reachability as well as organizer stability. Frequently used items should remain accessible without unsafe reaching, while emergency items should remain easy to locate and retrieve. Groceries, tools, kids items, or emergency supplies may require repositioning when their weight or location affects load balance, access, or movement after installation.
This chart shows the key checks to verify load balance, accessibility, and movement risk after loading a car organizer.
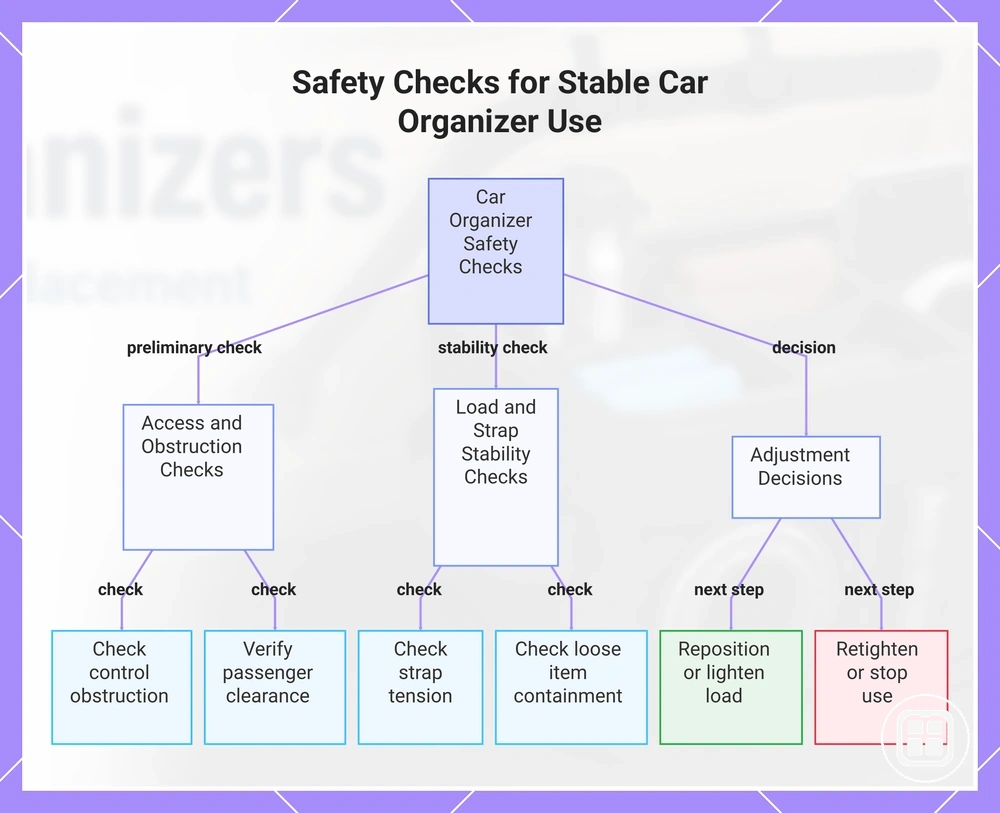
Safety Checks for Stable Car Organizer Use
A secured car organizer should not block controls, shift under normal driving conditions, interfere with passengers, or create loose-item risk. Safety checks help confirm that the organizer remains suitable for regular use after installation and loading. Stable use depends on installation quality, item weight, vehicle motion, and organizer condition.
Safety Checks for Stable Car Organizer Use verify obstruction, movement, load, passenger clearance, and retightening decisions before regular driving.
- Blocked controls: Confirm that the organizer does not obstruct controls, driver access, or normal vehicle operation.
- Strap tension: Check that strap tension remains consistent and retighten if looseness or shifting becomes noticeable.
- Load height: Review load height and reposition heavy items lower where practical if a higher center of gravity increases movement risk.
- Loose-item risk: Verify that heavy items, sharp items, or unsecured contents remain contained and do not create loose-item risk.
- Passenger clearance: Confirm that passenger clearance, seat movement, comfort, and access remain practical after loading.
- Emergency access: Check that emergency items remain accessible without extensive unloading.
- Repeated movement check: Perform a repeated movement check after loading and after normal use to identify changes in stability.
Decision signals help determine whether adjustments are needed. Reposition the organizer if blocked controls, reduced passenger clearance, or recurring movement appear. Lighten the load if item weight increases movement or raises the center of gravity. Retighten when strap tension decreases, and stop using the setup until corrected if noticeable movement remains after adjustment.
A repeated movement check may be useful after load changes, item relocation, or extended use. Stable use can change when item weight, organizer condition, or driving conditions change, so periodic verification can help identify new movement or access issues.
This chart shows the primary safety checks and adjustment decisions needed to ensure stable and safe car organizer use after installation.
Common Installation Mistakes That Cause Sliding or Poor Fit
When sliding or poor fit happens, weak surface contact, loose straps, overloaded compartments, wrong placement, or a mismatched size are often the most common installation mistakes. These conditions can lead to movement issues, blocked access, leaning, sagging, or strap loosening even when the organizer initially appears secure. The diagnostic purpose is to connect visible symptoms with installation-related causes and practical correction checks.
Common Installation Mistakes That Cause Sliding or Poor Fit can often be identified by comparing the mistake, likely cause, visible symptom, and practical correction shown below.
| Mistake | Likely cause | Visible symptom | Practical correction |
|---|---|---|---|
| Weak surface contact | Limited grip or uneven contact with the surface | Sliding or shifting | Reposition the organizer and recheck surface contact |
| Loose straps | Insufficient tension or strap loosening | Movement issue or position shift | Retighten straps and recheck buckle engagement |
| Overloaded compartments | Uneven load balance or excessive item weight | Leaning or sagging | Redistribute weight and review compartment loading |
| Wrong placement | Unsuitable installation location | Blocked access or recurring movement | Move the organizer to a more suitable position |
| Mismatched size | Organizer dimensions do not suit the available space | Poor fit or unstable positioning | Recheck fit and available installation space |
Weak surface contact can reduce grip and contribute to sliding when the organizer does not maintain consistent contact with the installation surface. If movement continues after repositioning, the next check may involve confirming whether the securing method suits the installation conditions.
Loose straps can allow gradual position changes when tension decreases over time. Strap loosening, buckle alignment, and anchor-point conditions may contribute to a movement issue, so a tension adjustment and recheck can help determine whether the cause remains installation-related.
Overloaded compartments, wrong placement, and mismatched size can create a fit issue even when straps remain secure. Uneven load balance may lead to leaning or sagging, while limited vehicle space may contribute to blocked access. If repeated adjustment does not improve fit or stability, the correction may require a different organizer size or a different securing method rather than further installation changes.
The products below are useful examples for comparing available options. Before buying, check that the compatibility criteria, key features, and product details match your needs.